Types of slope roof solar mounting systems and installation tips
If you have house,install solar panel on your house rooftop would be a perfect decision.Solar power will help you to save money and earn money,meanwhile,save the earth.
Most houses have a sloped roof design.Therefore, the solar mounting structure needs to adjust solar panels to an inclined surface. In order to do so, manufacturers offer several options:
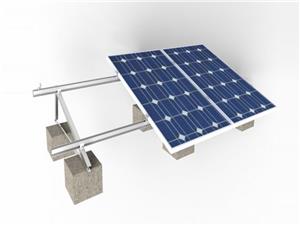
#1 Railed mounting system

The most common roof mounted structure of all. Consists of attaching a set of rails to the rooftop.
Each solar panel is then attached to the rails through a set of clamps. The rails are secured to the rooftop by screws and bolts.Solar panel attachment to the roof.
This type of installation directly uses bolts and screws to secure each panel to the roof.
Its advantage is that manufacturing and shipping costs are reduced, which makes the installation faster.
Solar panels can be placed in the way selected by installer, because they are not as limited in their positioning as they would be with the rails.
The main downside of the rail-less system is the learning curve of the installation. This requires installers to be experienced in performing rail-less mounting systems.Furthermore, it is advisable to avoid the use of rail-less when the panels are to be installed on crooked or tile roofs. It is also important to know that rail-less systems imply more attachment points. At the end, this could end up with more holes in your roof.

However, market trends seems to be changing. Rail-less systems are becoming more attractive for investment purposes than the railed mounts–mainly because the long term savings of rail-less systems seem to be much higher than the rail mounted.
#3 Shared-rail mounting system

This type of mounting system works the same as the railed system. The difference lies in the number of rails needed to be installed.While railed systems for two solar panels row use four rails in total, shared-rail systems use only three rails — by using two rails on the edges and one in the middle that shares the two rows.Shared-rail solar mounting system
Solar panel installation costs and time are reduced by using this technique, as one or two rails are no longer needed and neither are the mid and end clamps.This system also implies less perforations to your roof.
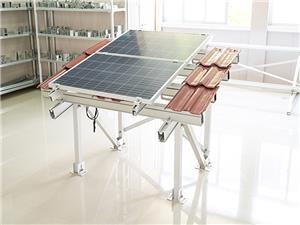
#4 Flat roof

Flat roofs are often found on commercial or utility buildings. But there are also many households with flat roofs that require different approach than sloped roofs.The main mounting system used on flat roofs is known as the Flat Roof Ballasted Racking System.
Photovoltaic system on a flat roof
This system consists of a previously assembled structure with a set of ballasted blocks that go to the bottom and act as the support for the system, while attaching panels and the mounting system by the use of clamps and clips.Among the greatest advantages of this mounting type is fast and easy installation and no need (or if, very few) for perforations in the roof. It also offers some grade of flexibility to adjust the tilt typically between 5° and 15° .
Roof mounted solar system installation
Now that you have a good idea about the solar panel roof mounting systems options, it’s good to know how the installation is done.
The usual process begins with this set of steps that an installer needs to follow to install a typical railed mounting system:
Preparing all required components. Drilling, pencils, fall protection kit, chalk blocks, rails, clamps, bolts, screws and more.
Determining the distance between the rails on the roof. According to the distance of pre-drilled holes in solar panels that you bought. Draw a reference line with the use of a chalk line.
Checking in the guidelines of local authorities. Generally, these limits are related to the edges of the roof and will be necessary to take into account when setting the initial position of the rails and the panels.Finding rafters on the rooftop. Drilling a spot hole through the roof into the attic. After drilling and locating the position of the drill from the inside, the installer is able to adjust the center of the truss that will be the supporting spot for the rails.
Mounting the flashings. After securing hole positions, the installer must mount the flashings (the supporting structures that will attach the panels to the roof). Bolts and caps are then used to connect these flashings to the rails.
Mounting the solar racking. Rails are put in place. The installer also needs to make sure that they are lined up and are properly elevated with the help of the flashings.
Wiring management clips and installation of grounding bolts. Grounding bolts are attached to the bare copper wire that goes to the grounding system of the house.
Installing micro-inverters or power optimizers of each panel and attaching the wires to the management clips.
Securing solar panels to the mounting system. Finally, the installer uses the clamps and T-bolts to make sure the panels are well-tight to the mounting system.