What are the components of a solar roof mounting system, and how to install it?
What are the components of a solar roof mounting system, and how to install it?
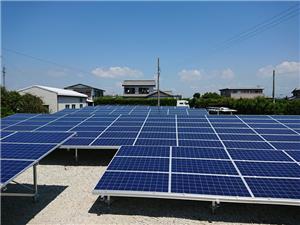
Solar Mounting Roof systems have recently become more popular due to their cheaper installation costs and utilization of space. For houses with limited space, a roof mount is more beneficial since it does not take up any space for other activities.
There are many manufacturers of high-quality solar roof mounts and the products on the market now are the roof mounting system, the carport mounting system, the solar photovoltaic mounting system, and the agricultural solar PV mounting system.


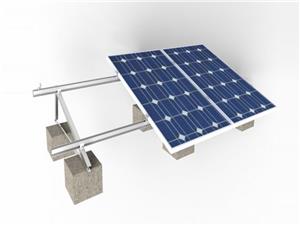
Solar Rail; A solar rail has a side, top, and bottom for tile hooks which are connected to the solar panel using bolts. solar rails are cost-effective and easy to install and manage. They are made from high-quality aluminum and can be mounted on roofs and the ground in a portrait orientation as well as landscape orientation.
Mid clamps; are used in attaching solar panels. The number of mid-clamps needed depends on how many solar panel modules are being used. For example; 5 rails require 40 middle clamps. Mid clamps are supposed to be carefully chosen depending on the thickness and size of the modules.
End Clamps; solar end clamps are made to be corrosion resistant and strong from materials like anodized aluminum. They are used for PV kits and arrangements which can be interchanged randomly. And they are used in fixing any type of the solar panel in place.
Rail Clamps; rail clamps are made from high-quality aluminum used in anchoring solar panels. They are highly resistant to corrosion and strong winds. They are easy to install and are recyclable.
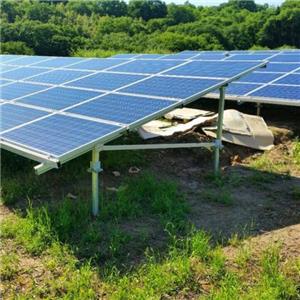
In recent years, the solar mounting rooftop system has become quite popular due to its benefits as opposed to the ground mounting system. There are several advantages of roof-mounted solar panels, especially for people and businesses that are on a budget with space restrictions/ limited space.
1. Lower installation costs
Solar rooftop mount systems are cheaper to install. They require less time, resources, and laborers during the installation process. But this is only possible if the roof is stable enough to carry the weight of the solar panels. If not, then the roof will be replaced which may lead to higher costs.
For the panels to last longer and reduce costs the roof should be of excellent weight and quality to avoid regular changing and installation which could increase the cost.

1. Utilization of unused space
The roof of a house is usually not used for regular daily activities by its residents. Hence making It the perfect place to mount solar panels. Placing them on the roof will save space on the ground for other activities.
2. Easier installation of the Panels
Roof solar panels are easier to install compared to ground solar panels. This is because they require fewer tools and resources and there is no need to dig the ground for a base/ foundation.
Also placing the panel on the roof is easier in terms of sunlight access while on the ground the people need to look for a spot where there is less shade.
3. Roof Protection
Placing solar panels on the roof help in protecting the roof against winds and snow despite not being its purpose it does help in that aspect.
4. Direct access to sunlight
One of the major advantages of a solar roof mounting system is that there is minimum shading on the roof. This depends on whether the house is located near any buildings or trees. Solar panels placed on the roof have the lowest probability of being shaded as opposed to ground solar panels.
If the house is located near buildings and trees that cover the roof then this might not be an enjoyable advantage to some people.
5. Safer and has limited access to people
Placing panels on the roof is safer, especially for children who may be harmed by them. It will also be away from unauthorized people or intruders who would want to access the panels. The challenging part about this is only during maintenance for the panels.
6. Orientation
Some solar mounting roof systems are flexible in terms of orientation. The solar panel can be placed in a position on the roof at an angle with maximum sunlight. The best position to achieve maximum sunlight is towards the south. If the roof is one-sided this limits the amount of sunlight the panels can get to generate electricity.
The Installation of a roof solar mount system is easier compared to installing ground roof panels and there are several steps to be followed when installing solar panels on the roof.
Step 1: Choosing the Right Location
The roof has several angles and the sun targets different and specific areas. Choosing the right place to place the panels is important. To get maximum sunlight, place the panels in the south direction.
Step 2: Solar panel Mount Installation
Depending on the requirements, pick the best place to mount the panels. The mount should be placed at an angle between 18 to 36 degrees. The size of the mount matters depending on the size of the roof as well. And it should be placed strong enough to resist intense weather conditions such as strong winds and snow.
Step 3: Installing the Panels and wiring
Installing the panels on the roof is important using bolts and nuts to hold the panels on the roof firmly in place. The panels must be held properly to avoid any accidents or damage to houses.

The wiring cables need to be properly insulated to avoid accidents and harm to people. It is crucial to use a fused junction to connect wires for safety. While doing the wiring, you have to wire together the solar modules using a fused combiner or junction connector.
Connecting wires allow energy to move from the charger to the bank for storing enough power to charge houses.
Step 4: Connecting Electrical Components.
After installing the panels in place, connecting the remaining parts is important to allow the flow of energy to the right places. There should be proper connections between the solar panels, the charger, and the battery bank.
Step 5: Performing a Test Run
Performing a test run is crucial and before that making sure every connection is in place is important. A test run ensures that every connection is in place and that there is no damage or harm caused by the system.
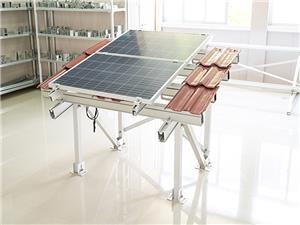
Solar panels can be installed using rails or without rails depending on the budget and roof type of the house. One of the major concerns of using roof panels is that they need to be drilled on the roof. But there has been a new technology of SolarPod which allows mounting solar panels on the roof without drilling. The SolarPod Is easier to install and expand with resistance to corrosion.
REFERENCES
https://www.starwinsolar.com/product-list/solar-roof-mounting-system